SD Cards, an abbreviation of Secure Digital Cards are one of the highly demanded Data Storage Devices. They are also considered to be an excellent data storage device. We all use them to store our valuable asset, Data. This precious data can be in the form of your memorable photos, your important document, favourite videos, and much more. These storage devices are widely accepted by all, owing to their ability to record, salvage, and stream a large amount of ultra-high-definition data in the digital format.
Although, there is no dearth of the best and effective Secure Digital (SD) Cards manufacturers, but, out of all the available options, Kingston is the noteworthy as well as world’s foremost memory card manufacturer and supplier. Kingston SD Cards are known for their high-speed class, excellent security, better reliability, file formats, and best-in-class compatibility. Even if they are reliable, yet they are prone to any form of damage. When this most convenient, portable data storage device turns corrupt, damaged, or is formatted, all the stored data runs at a greater risk. Therefore, if not handled properly, it eventually results in permanent loss or inaccessibility of the saved data. In this situation, the recovering data becomes more of a necessity.

Before we discuss the various methods to recover the lost or deleted data, let’s have a look at few errors that a user can encounter:
- When an individual connects the SD Card to the system, the Windows generates a message prompting the SD card requiring a formatting.
- Some of the data from SD card is missing
- While trying to read the SD card, either no folder appears, or in case if folders are visible, they cannot be opened.
- While trying to access the data, a dialogue box displaying ‘corrupt memory card’ or ‘memory card error’ appears on the screen.
- Able to view the data in the system as well as another device but is not able to copy it.
Now that we are aware of the common errors, let’s look at some of the effective ways by which we can easily fix these errors:
- Connect your SD Card to Another Device
The simplest way is to connect your SD card to another device. This is because, sometimes, some of the devices are unable to read the SD card, therefore, showing incompatibility.
- Use ‘chkdsk’ command
You can use this command to recover your lost data. For this, you need to click the Start menu, open the “Run” dialogue box, type ‘cmd’, and press the ‘Enter’ key. Next, the Command Prompt window will open up. Here, type in ‘Chkdsk’ followed by the drive letter, colon, & /f and press the ‘Enter’ key. It will now search for the possible errors and try and fix it up. During the process, you simply have to follow the prompt messages.
- Assign a New Drive Letter to the Connected Device
Sometimes, it usually happens that the reader is assigned a drive letter but is not able to read it. Here, you need to assign a new drive letter to the connected card via Operating System settings.
- Try a Built-in Solution
Usually, SD cards have a built-in recovery solution. You can try it to recover your lost data. For this, you need first to cross-check whether there is a used space or not. It can easily be done by right-clicking on the drive letter and selecting properties.
- Reinstall the Driver
In this method, you need to reinstall the driver. To do so, double-click on the disk drive options available on the device manager. Here, select the removable drive name and uninstall it. Now, restart your system and reconnect the SD card.
- Third-Party Data Recovery Tool
If none of the mentioned above Solutions works, the only practice to recover lost /deleted data is Data Recovery Software.
Undoubtedly, there are several Data Recovery software available in the market. But choosing the one that effectively caters to your need is not easy. Usually, users search for the one that is easy, quick, simple, reliable, and most importantly, is secure. Therefore, if you are looking for an advanced Data Recovery Software to recover deleted files and further, also focus on these parameters, then opt for Stellar Phoenix Windows Data Recovery – Professional software.
About Stellar Phoenix Windows Data Recovery – Professional
Stellar Phoenix Windows Data Recovery – Professional is a comprehensive all-in-one solution intended to recover almost everything. This dedicated Data Recovery tool is designed to cater to all your data loss apprehensions. It employs three simplified steps—Select, Scan, and Recover. On this basis of these, it helps you undelete all your lost or deleted data, be it sensitive information files, business-critical complex documents, treasured photographs, cherished videos, and much more.
Advantages of Using Stellar Phoenix Windows Data Recovery – Professional
- Intuitive interface
- Powerful Scan engine
- Turn on/off Preview option
- Detailed scanning report
- Complete Raw file recovery as well as HD-MOV Raw Recovery option
- Image Creation and Resume Recovery option
- Option to search specific folders and specific file types
- Multiple DPIs (100%, 125%, and 150%) support
- Support for improved Preview as well as Unicode
- Compatibility with almost more than 300 file types
- Support FAT32, FAT16, FAT, NTFS, and ExFat file system
- Advanced settings option to edit the existing header and add new header
- Compatible with all recent Windows Versions— 10, 8.1, 8, 7, Vista, and XP
Step-by-Step Recovery Procedure
Follow the steps below:
- Download, Install, Register, and Run Stellar Phoenix Windows Data Recovery – Professional.
- After the successful launch, it will direct you towards ‘Select What to Recover’ From this window, select the data type you wish to recover. You can choose any of the options from the available three primary recovery options— ‘Everything’, ‘Documents, Folders & Emails’ or ‘Multimedia Files’

- Now, click next. This will take you to the ‘Select Location’ screen where you will choose the location which you want to scan. Further, you can also select any specific folder by clicking on ‘Select Folder’

- Now, click scan and start scanning. The scan window will display a detailed-oriented scanning status. It includes details about time required, the time consumed, and the time left to complete the scan. Further, it also has a Turn on/off Preview option whereby you can turn off the preview option to increase the scan speed. You can also pause the scanning process and resume at any point if you don’t wish to undelete the entire volume.

- Now, a dialogue box displaying details of found files and folder will prompt. In this scan result window, simply click the back On clicking it, you will be directed to save scan option.

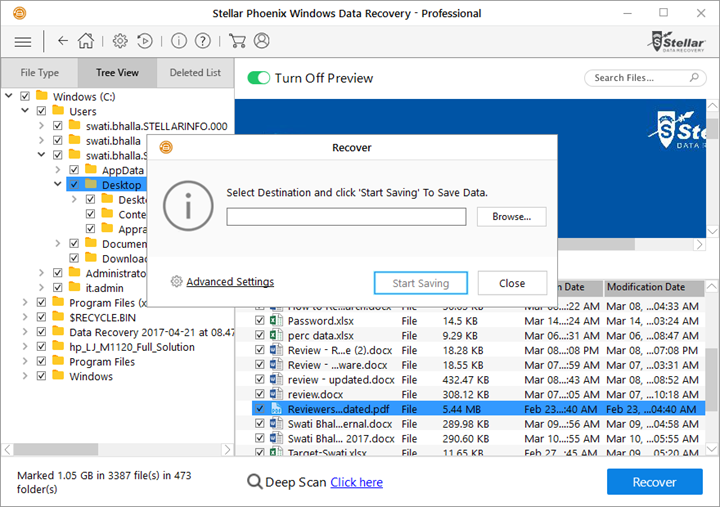
- On successful completion of the scan process, you will be able to see the preview all the recovered files in the ‘Preview window’. This window will display the list of all recovered files in three different viewing perspectives—File Type, Tree View, and Deleted List. Choose any viewing perspective and start viewing the files or folders by clicking on it.

- Now, choose all the files and folders you want to undelete and start the recovery. Here, a dialogue box will prompt and ask for the destination. Either you can add destination directly or can choose Advanced Settings option to configure advanced recovery.

- Click Start Saving to save the recovered files. After successfully saving, you can navigate to the specific destination to view the recovered files.
Final Thoughts:
Now, you must be aware of all the possible process using which you can easily fix issues of SD cards and recover deleted files from a Kingston SD Card. Use your discretion to select the right recovery process and employ it.


Be the first to comment on "Best Ways to Recover Deleted Files from a Kingston SD Card"